Sow & Grow! (How to Grow Plants From Seed)

Teeny, perfect tomato seeds, full of promise and ready for planting.

My tomatoes are germinating!

That's right - as previously mentioned, mid-March is optimal tomato-seeding time, and I did just that.  Now the results are popping up from the soil surface, and my garden is beginning to become a reality before my eyes.  Are you in on this awesome action?  Well, this post will show you how to get it done.  Don't worry if you haven't started yet - it's not too late!  Follow along in the steps below, and feel free to drop me a line if ever you have questions.  Plus, the FREE SEEDS offer still stands.  If you need some seeds to get you growin, just send me an e-mail and I'll mail them to you right away!  Ready?  Let's grow!

1) Gear Up!  
As listed in my last post, get yourself outfitted with some basic essentials, including a tray or some pots, a growing medium like seed-starting soil, seeds, and a source of light.

2) Get organized.

Your own notes make a helpful tool.
This step is crucial, and it's fun if you're a little bit obsessive-compulsive like me! I like to arm myself with a notebook, as I feel it's important to keep records of what I planted, when I planted it, and how well it germinated.  I'll use that notebook all season long to make notes about the garden and it's progress, as well as when I harvest and any problems I encounter.  

Seed packages are full of useful info.
Gather together ALL of the seeds that you plan to plant, and take a look at the packages.  Seed packages are a wealth of information, but for now, the most important info will be how long your plants need to grow indoors before setting out at 'last frost'.  In southern Ontario, last frost usually occurs in early May... but that, of course, can vary!  A helpful chart is located here.  Tomatoes require 6-8 weeks of growing indoors before planting out, so mid-March puts you right on the money.  That said, you're better late than never, and you can generally sow right into the middle of April and still manage to get loads of fresh, ripe tomatoes this summer.


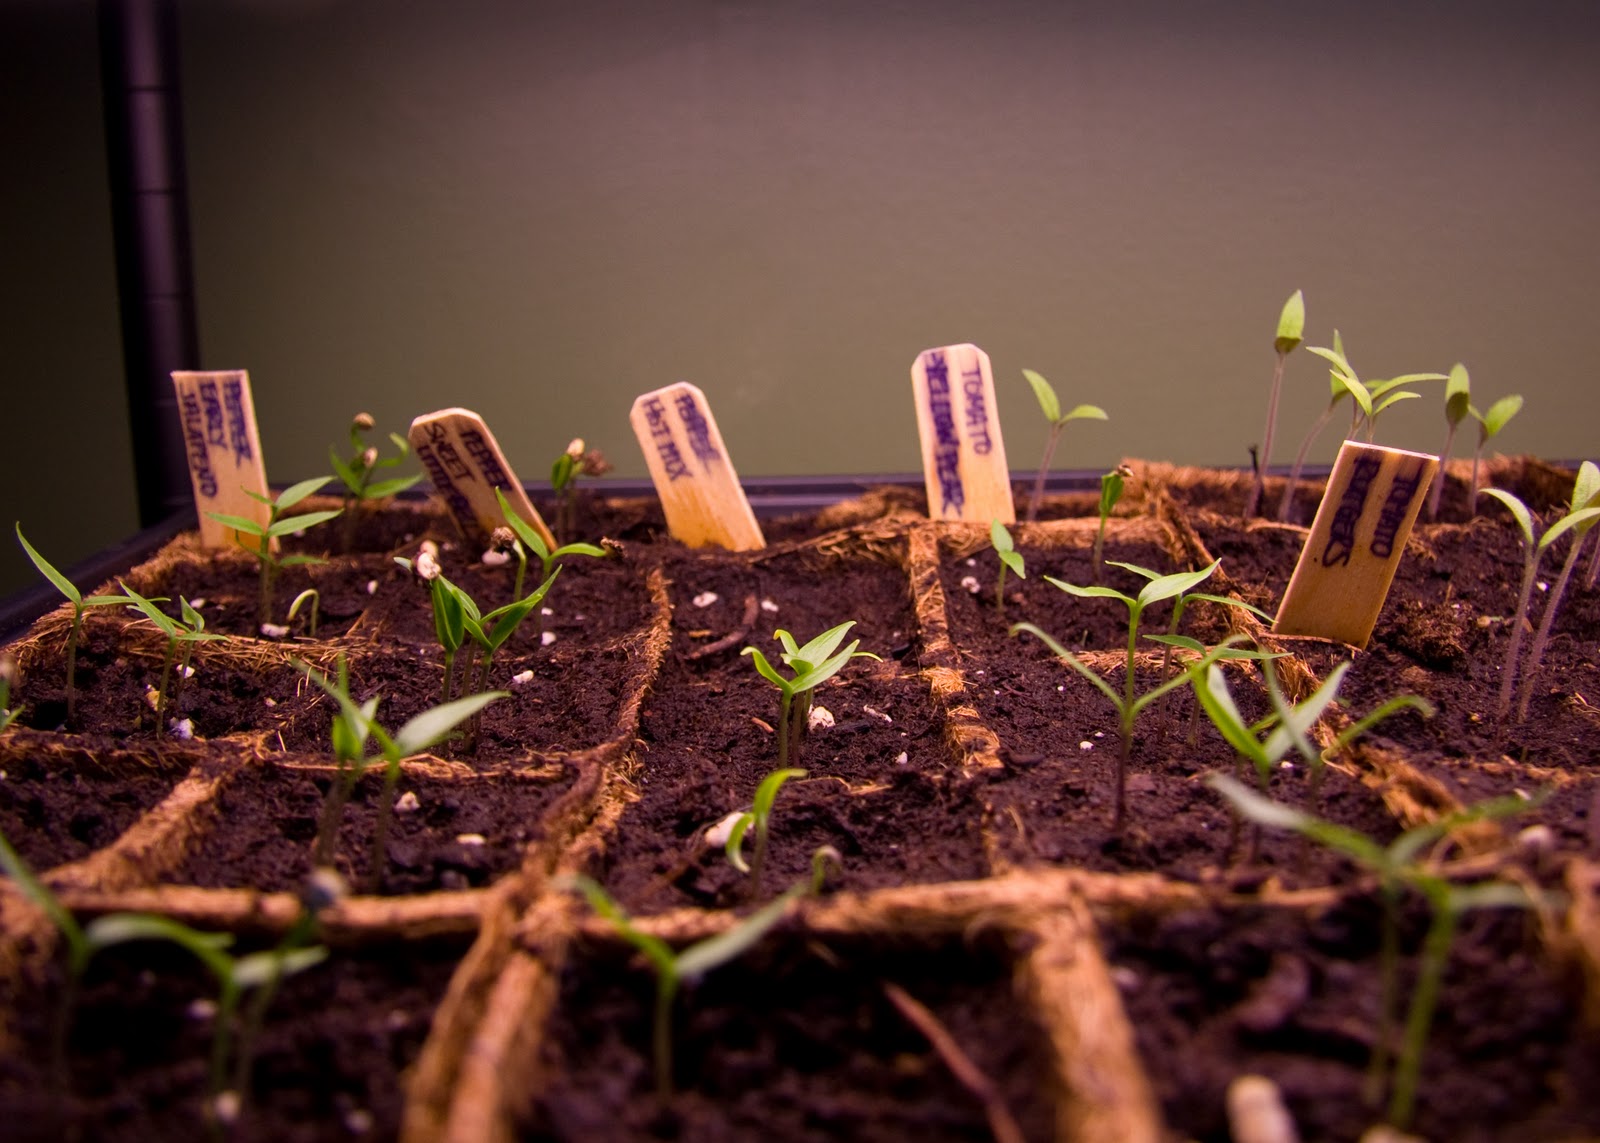
Group 'like' plants together, and don't forget to label!
Plan to sow all of the seeds with 'like' growing requirements together.  For instance, all of my tomatoes and sweet peppers need 6-8 weeks indoors, so they are all planted at the same time.  In a few more weeks, my squash and watermelon, which only need 2-4 weeks, will also be sown together.  Makes sense, yes?  When you've gathered your seeds, determine how many of each plant you want to grow, and make sure that you have enough space to grow them.  I plan this out in my notebook, recording the number of plants in each variety I plan to grow, and account for the number of cells that I have in my tray.  I want it FULL FULL FULL!  Finally, I always prepare labels for each variety in advance so that I can easily keep my seeds straight once I get going.


3) Fill your containers with soil.

I'm using biodegradable trays and commercially-prepared seed-starting mix.  In order to give my seeds a little bit of an extra boost, I've also mixed in some worm castings at a ratio of about 1:3.  Worm castings boast some serious benefits - they offer nutrition to young seedlings, making them an ideal natural fertilizer, but they also are touted to help protect seedlings from fungal diseases and have even been credited with aiding in faster seed germination.  They're purely optional, and this will actually be my first time mixing them in with my seed-starting medium.  


I use a small plastic bin for mixing, and I think it's best to slightly moisten the soil as you mix.  Try to gently break up any clumps or bumps, and simply drop handfuls into your pot or tray.  Fill it up to the top, and tap the tray on the floor or table to encourage the mix to settle in and close up big gaps.  Top off the surface so that it's relatively level, and gently smooth with your hand.  Ta da!! You're ready to start sowin'!

4) Sow your seeds!
Sow multiple seeds per cell to help ensure a viable plant.
Plant one variety at a time, making sure not to mix everything up!  Again, refer to your seed package - it will tell you how deep to plant each variety.  A bit deep is ok, but too shallow can result in your little seedlings getting washed up when you water, and that's heartbreaking!  I begin by making small divots into the soil surface of each cell.  Then drop 1-3 seeds in each cell.  I always sow several seeds in each cell, which will allow for any germination troubles, and can easily be thinned out later... ultimately, you want a single plant per cell or pot.  When you've seeded a single variety, cover over the seeds with a bit of soil and make sure to label.  Then repeat the process with each variety until you're done!

Planted, labeled and ready to grow!

5) Water them in - carefully! 
Water is crucial to the successful germination of your seeds.  When your planting is complete, you want to water the soil so that it's damp, but not wet.  The seeds will need to stay consistently moist and warm in order for their little coats to break open and for their internal mechanisms to trigger growth.  I water my newly-planted seeds with warm water, gently delivered with a watering can that has small holes.  Other options include using a spray bottle, or carefully pouring from a cup or jar.  Just don't wash your little babies away!  Many growers advocate for bottom-watering - add water to a tray or dish beneath the seedlings, allowing the water to be drawn up through osmosis, which avoids disturbing the soil on the surface.  I opt to water them gently from above at first, then switch to bottom-watering once the plants are established.  The choice is yours!


6) Cover up!
When your seeds are planted and watered, you can hurry them along and help to keep them toasty and moist by covering them with a clear plastic dome.  Mine came included with my tray kit, but you can also substitute with a clear baking tray or plastic wrap.  You'll keep the tray on until the seeds germinate.


7) Lights and action!
Supplemental light from fluorescent fixtures is helpful.
 Light is very important to your little plants, and supplemental light from an artificial source is highly recommended.  My set-up is pretty simple - I put my trays on a table in my laundry room, where it stays quite warm.  I then ran cheap curtain rods along the ceiling and from them hung 2 fluorescent 'shop light' fixtures that are 4' in length from adjustable chains with S-hooks.  These fixtures are the most economical option, and are widely available at hardware and box stores.  Regular fluorescent tube lights work just fine, but I've upgraded my bulbs to the 'plant and aquarium' bulbs that offer a wider spectrum of light.  Keep the light source very close to the soil surface, and maintain that space as the plants germinate and grow, raising the light as the seedlings get taller.  This sounds intimidating, I know... but this set-up is something that I arrived at after several years.  It's easy to start with a tray of seeds on a stack of magazines under a small desk lamp.  Don't sweat the small stuff - plants want to grow!  We just try to facilitate the process and attempt not to thwart their mighty efforts.

So... ready to try it??  Please drop in and let me know how your growing is going, and stay tuned for updates on this season's crop as I go from seed, to garden, to harvest.  I can't wait to share another season of Mo Farm adventures with you!  Happy sowing! 

Gear Up! (What You Need to Grow From Seed)

Growing plants from seed is rewarding, fun and not nearly as tough as you think!
Are you ready for an adventure in food production?  Growing your own food at home is awesome - it's healthy, it's fun (mostly) and best of all, it's so rewarding!  With a bit of effort and some basic skill and patience, this can be the summer that you bite into your very own homegrown tomato... and trust me when I tell you that there is nothing else quite so delicious!

So - where to begin?  First off, if you're not down with the whole 'growing from seed' thing, that's ok. You can still play along this season, you just have to sit out the first couple of rounds!  I love growing my plants from seed for a few reasons.  Mostly, it's because something happens to me around seed sales, swaps and catalogue listings... I lose control of myself and end up impulsively collecting varieties for the sheer thrill of it.  That said, growing from seed gives me the satisfaction of having been in control of the growing process from the very beginning, which to me, adds extra pride and bragging rights!  But it also allows me to grow a wider range of varieties, many of which are rare, obscure or hard to find.  If you choose to buy your plants as babies (or 'starts') you can still enjoy all of the rush and joy of growing food at home, without the extra steps of seeding and coddling the little ones.

For those with a bit more cavalier spirit, this week I'll walk you through the steps that you need to take to grow plants successfully from seed.  We'll sow and grow together, and if you're in my climate zone, you can just monkey-see-monkey-do your way through this thing.  Good deal!  

If you're been into any sort of garden center lately, you'll have found that there is no shortage of equipment, accessories and supplies that can help to make seed-starting easier.  With such a wide range of options available, it's easy to find a system that will work for your space and your budget... but it's also easy to get carried away.  There are a few really basic things that you will need to grow from seed, and everything else is optional.  Here's what I use at home:

Trays, Pots or Containers
Naturally, you're going to need something to physically grow your plants in.  I prefer a biodegradable tray system (similar to the one pictured left) that consists of a plastic undertray, clear plastic dome lid and coir cells that can be filled with whatever growing medium I choose.  This is a personal preference, and one that I've found works well for me.  You can use a traditional cell-pack tray, small pots, toilet rolls, yogurt containers.... really anything will do as long as it's not too deep and will hold soil, but allow water to drain freely.  The item shown, which has 72 cells, runs for about $9-10 retail, and you can find other sizes and styles from $4 and up.

Growing Medium
You don't grow plants in dirt!  I start my seeds in a 'propagation' mix that's ready-to-use right out of the bag.  It's light and airy, and is specifically mixed to provide the right amount of water retention and aeration that will allow seeds to thrive.  Some people choose to make their own mix out of peat, coir, sand... there are lots of options.  I recommend starting simple with a mix that is made for growing seeds or cuttings for the best results.  Once you gain confidence and experience, you can start customizing your system to work best for you!  (Please note - While I've chosen an image from Miracle Gro and that is what I bought this season, I'm not endorsing any specific brand here... just providing what I feel is a good visual example.) 

Light
Getting enough light is easily the biggest challenge to a home seed-starter.  While a bright, south-facing window CAN do the trick, I've never had abundant success at growing healthy plants without a bit of supplemental light.  If you're growing a few pots or a single tray, consider a small fluorescent strip light, counter light or lamp.  They're usually easy to find in box stores and are quite inexpensive, and will save the hassle and worry of dealing with leggy, stretched-out plants!  Last year, I built a little 'grow op' in my kitchen that consisted of a metal shelf unit, 2 4' ballasts and 4 T-12 bulbs - this setup cost a total of about $80 (ouch!) but I expect that it will serve me well for several years.  To me, this was a worthwhile investment.  Here's a glimpse of the Mo Farm grow op for this season...

I'll provide instructions for creating your own grow op in a future post... stay tuned if this is of interest to you!

Seeds
Naturally, the last essential ingredients are the seeds themselves.  If you're looking for free tomatoes, I'm your source!  If you'd like me to send you some, please just e-mail your address and a small description of your growing area (garden, pots, balcony, etc) to my at mofarmniagara@gmail.com.    

These are the basic, nitty-gritty must-haves.  There are a few accessories that can help to make growing easier, and I'll detail them when we start the growing process.  In my next post, I'll detail the ins and outs of sowing and growing your seeds as I start my tomatoes.  Are you still hesitant?  C'mon... what are you waiting for?  Let's grow together this season!  I'll coach you every step of the way!

Let's Grow Together!

FREE TOMATOES!  It's almost time to start tomatoes from seed.  Will you join me this season?
 
Well... whaddaya say?

Traditionally, March 15th (or thereabouts) is 'tomato time' in southern Ontario.  It's the date that tomato seeds are started to give them just the right amount of time to grow before setting outdoors at last frost in May.  I challenge you to join me this season!  I'm giving all of you a week of notice - next weekend, I'm sowing my tomatoes and I'd like you to join me.

This week, I'll run through the must-have equipment and basic set-up directions for starting your very own tomatoes from seed.  Then, next Sunday, we can all sow together.  Sound like fun?  You can follow along all summer as we grow our babies from teeny plantlets to giant, fruit-producing goliaths.  I'll share my tips and tricks, and help you along every step of the way.

Hesitant?  Ok, I'll even sweeten the pot... if you don't have any tomato seeds to start, leave me a comment and I'll mail some to you for free.

There you go, friends - no excuses.  Let's make sweet summer magic together!  

'Round the Bend


It's March, and frankly, not a moment too soon.  I've got a serious case of the winter blahs, and the shot of sunshine and hope that I received today is barely taking the edge off.  With a lingering chest cold and the exhaustion of tackling an ever-present to-do list that comes with a new house, I'm fighting the urge to crawl into bed and stay there until May.

What gets us through these months of freezing temperatures and bleak, gray landscape?  Well, for me, it's the promise of better days full of warm sun, sweet blooms buzzing with the sound of bees and the smell of wet soil and grass.  The dreams of a fresh start and the hope of summer keep me going when I can barely remember what a watermelon tastes like.  Last night, I began to work on this dream of a new season... I started my seeds.  Eggplants, hot peppers, broccoli, brussels sprouts, onions and leeks are officially in my future.

The future of Mo Farm will begin to take shape in the next several weeks as I survey my lot and plan my beds.  More seeds will be sown, the last straggling seed orders will be placed.  I'll find asparagus crowns (I hope) and seed potatoes to plant.  I'll draw and scribble in my notebook.

Spring, my friends, will come.  And I can hardly wait.